

How To Configure Vnc Server In Windows 7
Introduction
VNC or Virtual Network Computing is a platform-independent protocol that enables users to connect to a remote figurer arrangement and use its resources from a Graphical User Interface (GUI).
Information technology's like remote controlling an application: the client computer'due south keystrokes or mouse clicks are transmitted over the network to the remote reckoner. VNC also allows clipboard sharing between both computers. If you come up from a Microsoft Windows server background, VNC is much like the Remote Desktop Service, except it'due south also available for OS X, Linux, and other operating systems.
Like everything else in the networking world, VNC is based on the client server model: VNC server runs on a remote figurer — your Droplet — which serves incoming customer requests.
Goals
In this tutorial we will acquire how to install and configure a VNC server on CentOS 7. Nosotros will install the TigerVNC server which is freely available from the TigerVNC GitHub repository.
To demonstrate how VNC works, we will too install the GNOME desktop on your CentOS server. Nosotros volition create two user accounts and configure VNC admission for them. We will then test their connectivity to the remote desktop, and finally, learn how to secure the remote connection through an SSH tunnel.
Prerequisites
The commands, packages, and files shown in this tutorial were tested on a minimal installation of CentOS 7. Nosotros would recommend the following:
- Distro: CentOS seven, 64-bit
- Resources Requirements: A Droplet with 2 GB RAM
- To follow this tutorial, you should use a sudo user. To understand how sudo privileges piece of work, y'all can refer to this DigitalOcean tutorial
Warning: Y'all should non run any commands, queries, or configurations from this tutorial on a product Linux server. This could result in security issues and reanimation.
Step ane — Creating Two User Accounts
Showtime, we will create two user accounts. These accounts will remotely connect to our CentOS seven server from VNC clients.
- joevnc
- janevnc
Run the following command to add together a user business relationship for joevnc:
sudo useradd -c "User Joe Configured for VNC Access" joevnc Then run the passwd control to change joevnc's password:
sudo passwd joevnc The output volition ask u.s. for new password. Once supplied, the account volition be ready for login:
Irresolute password for user joevnc. New password: Retype new password: passwd: all hallmark tokens updated successfully. Next, create an account for janevnc:
sudo useradd -c "User Jane Configured for VNC Access" janevnc Set the countersign for janevnc:
sudo passwd janevnc Pace 2 — Installing GNOME Desktop
Now we volition install GNOME desktop. GNOME is a collaborative effort: it's a collection of free and open source software that makes upwards a very pop desktop surround. In that location are other desktop environments like KDE, but GNOME is more than popular. Our VNC users will employ GNOME to interact with the server from its desktop:
sudo yum groupinstall -y "GNOME Desktop" Depending on the speed of your network, this tin take a few minutes.
Once the bundle group is installed, reboot the server:
sudo reboot Troubleshooting — Server Stuck at Kicking Phase
Depending on how your server has been ready up, when the machine starts up it may remain in the kicking phase showing a bulletin like this:
Initial setup of CentOS Linux 7 (core) 1) [!] License information (Licence not accustomed) Delight brand your selection from above ['q' to quit | 'c' to proceed | 'r' to refresh]: To get past this, press 1 (license read), then two (accept licence), and then C (to continue). Y'all may have to press C 2 or more times. The image below shows this:

If you don't come across this error and the boot process is smoothen, all the improve – you can movement on to the next step.
Pace 3 — Installing TigerVNC Server
TigerVNC is the software that will allow us to make a remote desktop connexion.
Install the Tiger VNC server:
sudo yum install -y tigervnc-server This should show output similar the following:
Loaded plugins: fastestmirror, langpacks Loading mirror speeds from buried hostfile . . . Running transaction Installing : tigervnc-server-1.ii.80-0.30.20130314svn5065.el7.x86_64 ane/1 Verifying : tigervnc-server-one.2.80-0.30.20130314svn5065.el7.x86_64 1/1 Installed: tigervnc-server.x86_64 0:1.2.lxxx-0.30.20130314svn5065.el7 Complete! At present nosotros have VNC server and the GNOME desktop installed. Nosotros have also created two user accounts for connecting through VNC.
Pace 4 — Configuring VNC Service for Two Clients
VNC server doesn't offset automatically when it'due south first installed. To check this, run the following control:
sudo systemctl status vncserver@:.service The output will be similar this:
vncserver@:.service - Remote desktop service (VNC) Loaded: loaded (/usr/lib/systemd/organisation/vncserver@.service; disabled) Active: inactive (dead) You can also run this command:
sudo systemctl is-enabled vncserver@.service This should testify output similar this:
disabled So why is it disabled? That's because each user will start a separate example of the VNC service daemon. In other words, VNC doesn't run as one single process that serves every user asking. Each user connecting via VNC volition have to showtime a new example of the daemon (or the system ambassador can automate this).
CentOS vii uses the systemd daemon to initiate other services. Each service that natively runs nether systemd has a service unit of measurement file that'south placed under the /lib/systemd/organization directory by the yum installer. Processes that get started automatically at kicking time have a link to this service unit file placed in the /etc/systemd/system/ directory.
In our case, a generic service unit of measurement file was created in the /lib/systemd/system/ directory, but no link was made under /etc/systemd/arrangement/. To test this, run the following commands:
sudo ls -l /lib/systemd/system/vnc* You lot should run across:
-rw-r--r--. 1 root root 1744 Jun 10 16:15 /lib/systemd/system/vncserver@.service Then check under /etc/systemd/organization/:
sudo ls -l /etc/systemd/system/*.wants/vnc* This one doesn't be:
ls: cannot admission /etc/systemd/system/*.wants/vnc*: No such file or directory So, the commencement footstep is to start two new instances of VNC server for our two users. To practice this, we will need to make ii copies of the generic VNC service unit file under /etc/arrangement/organisation. In the code snippet below, you're making ii copies with two dissimilar names:
sudo cp /lib/systemd/organization/vncserver@.service /etc/systemd/system/vncserver@:4.service sudo cp /lib/systemd/organisation/vncserver@.service /etc/systemd/system/vncserver@:5.service So why did we add two numbers (along with the colon) in the copied file names?
Again, that comes dorsum to the concept of private VNC services. VNC by itself runs on port 5900. Since each user volition run their own VNC server, each user will take to connect via a split port. The improver of a number in the file name tells VNC to run that service as a sub-port of 5900. So in our case, joevnc's VNC service volition run on port 5904 (5900 + 4) and janevnc'due south will run on 5905 (5900 + 5).
Next edit the service unit of measurement file for each client. Open the /etc/systemd/system/vncserver@:4.service file with the vi editor:
sudo half-dozen /etc/systemd/organisation/vncserver@:4.service A look at the "Quick HowTo" department tells united states we have already completed the outset stride. At present we need to go through the remaining steps. The comments also tell us that VNC is a non-trusted connection. We volition talk virtually this subsequently.
For now, edit the [Service] department of the file, replacing instances of <USER> with joevnc . Too, add the -geometry 1280x1024 clause at the end of the ExecStart parameter. This just tells VNC the screen size it should start in. You will modify 2 lines in total. Here'due south what the edited file should look like (annotation that the entire file is not shown):
# The vncserver service unit of measurement file # # Quick HowTo: # 1. Copy this file to /etc/systemd/system/vncserver@:<display>.service # two. Edit <USER> and vncserver parameters appropriately # ("runuser -l <USER> -c /usr/bin/vncserver %i -arg1 -arg2") # three. Run `systemctl daemon-reload` # iv. Run `systemctl enable vncserver@:<display>.service` # . . . [Unit of measurement] Description=Remote desktop service (VNC) Afterwards=syslog.target network.target [Service] Type=forking # Clean any existing files in /tmp/.X11-unix environment ExecStartPre=/bin/sh -c '/usr/bin/vncserver -kill %i > /dev/nothing two>&1 || :' ExecStart=/sbin/runuser -l joevnc -c "/usr/bin/vncserver %i -geometry 1280x1024" PIDFile=/domicile/joevnc/.vnc/%H%i.pid ExecStop=/bin/sh -c '/usr/bin/vncserver -kill %i > /dev/nil 2>&i || :' [Install] WantedBy=multi-user.target Save the file and exit 6.
Similarly, open the /etc/systemd/system/vncserver@:5.service file in 6 and brand the changes for user janevnc:
sudo vi /etc/systemd/system/vncserver@:v.service Hither's just the [Service] section with the changes marked:
[Service] Type=forking # Clean whatsoever existing files in /tmp/.X11-unix environment ExecStartPre=/bin/sh -c '/usr/bin/vncserver -impale %i > /dev/nada 2>&1 || :' ExecStart=/sbin/runuser -fifty janevnc -c "/usr/bin/vncserver %i -geometry 1280x1024" PIDFile=/abode/janevnc/.vnc/%H%i.pid ExecStop=/bin/sh -c '/usr/bin/vncserver -impale %i > /dev/null ii>&1 || :' Next, run the post-obit commands to reload the systemd daemon and besides to make certain VNC starts up for two users at kicking fourth dimension.
sudo systemctl daemon-reload Enable the first server instance:
sudo systemctl enable vncserver@:4.service Output:
ln -due south '/etc/systemd/organization/vncserver@:4.service' '/etc/systemd/system/multi-user.target.wants/vncserver@:4.service' Enable the second server case:
sudo systemctl enable vncserver@:5.service Output:
ln -southward '/etc/systemd/system/vncserver@:v.service' '/etc/systemd/organisation/multi-user.target.wants/vncserver@:5.service' Now you've configured two VNC server instances.
Step 5 — Configuring Your Firewall
Next, we volition need to configure the firewall to allow VNC traffic through ports 5904 and 5905 only. CentOS seven uses Dynamic Firewall through the firewalld daemon; the service doesn't need to restart for changes to have effect.
The firewalld service should get-go automatically at system boot time, merely it's always good to check:
sudo firewall-cmd --state This should show:
running If the state is "not running" for whatsoever reason, execute the following control to make sure it's running:
sudo systemctl showtime firewalld Now add the rules for ports 5904 and 5905:
sudo firewall-cmd --permanent --zone=public --add-port=5904-5905/tcp Output:
success Reload the firewall:
sudo firewall-cmd --reload Output:
success Step half-dozen — Setting VNC Passwords
We are ane step away from seeing VNC in action. In this step, the users will need to set their VNC passwords. These are non the users' Linux passwords, merely the passwords to log in to the VNC sessions.
Open some other terminal connectedness to the CentOS seven server, and this time log in as joevnc.
ssh joevnc@your_server_ip Execute the following command:
vncserver Equally shown in the output below, the server will inquire joevnc to set up a VNC countersign. After typing in the password, the plan as well shows a number of files existence created in the user's dwelling directory:
You will require a countersign to access your desktops. Password: Verify: xauth: file /home/joevnc/.Xauthority does not exist New 'localhost.localdomain:1 (joevnc)' desktop is localhost.localdomain:ane Creating default startup script /dwelling/joevnc/.vnc/xstartup Starting applications specified in /home/joevnc/.vnc/xstartup Log file is /home/joevnc/.vnc/localhost.localdomain:ane.log Let'southward wait at the line New 'localhost.localdomain:one (joevnc)' desktop is localhost.localdomain:ane. localhost.localdomain was the server name in our example; in your example it could be unlike. Notation the number afterward the server name: (ane, separated by a colon). It'south not the number in joevnc'southward service unit file (which was 4). That'southward because this is the display number joevnc's session will run on in this server, not the port number of the service (5904) itself.
Next open up a new terminal session and log in as janevnc. Here as well, kickoff the VNC server and gear up a countersign for janevnc:
vncserver You should meet like output showing that janevnc's session will run on display 2.
Finally, reload the services from the main concluding session:
sudo systemctl daemon-reload sudo systemctl restart vncserver@:4.service sudo systemctl restart vncserver@:5.service Step 7 — Connecting to Remote Desktops with a VNC Client
For this tutorial, we volition assume users joevnc and janevnc are trying to connect to the CentOS seven server from their Windows computers.
They will each demand a VNC customer for Windows to log into the remote desktop. This client is just similar a terminal client like PuTTY, except it shows graphical output. In that location are diverse VNC client bachelor, but the 1 we volition use is RealVNC, available here. VNC Viewer for Mac Bone Ten is available for download on the same page, and the Mac version is fairly similar to the Windows one.
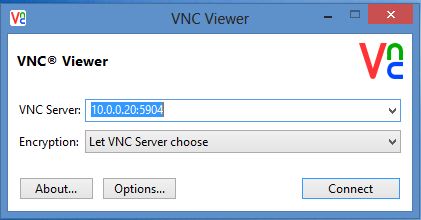
When VNC Viewer is started, it shows a dialogue box similar this:

In the VNC Server field, add the IP accost of your CentOS 7 server. Specify the port number 5904 later on the server's IP, separate past a colon (:). We used 5904 because that's the VNC service port for joevnc.
We take also decided to permit VNC Viewer cull the encryption method. This choice will just encrypt the password sent across the network. Any subsequent communication with the server volition exist unencrypted. (We'll gear up a secure SSH tunnel in the final step.)
In fact, a warning message shows just that:
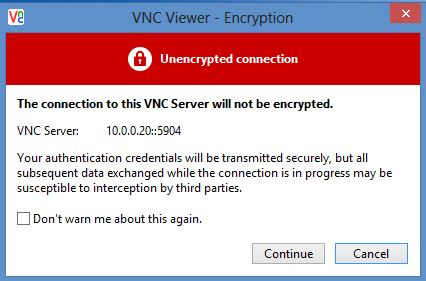
Accept the warning for now. A password prompt is displayed:

Enter joevnc's VNC password that you fix earlier.
A new window opens showing the GNOME desktop for our remote CentOS server:

Accept the default welcome message.
Now joevnc can start a graphical tool like the GNOME estimator:


You can go out this desktop connection open.
Now janevnc can also offset some other VNC session with the CentOS server. The IP address is the aforementioned, and the port is 5905:

When janevnc logs in via VNC Viewer, an empty desktop with a welcome message is shown, only like information technology was shown for joevnc. In other words, the two users are non sharing the desktop instances. joevnc's desktop should still be showing the calculator.
To close the remote desktop session, simply endmost the window will exercise. However, this doesn't stop the user's VNC service in the background on the server. If the service is not stopped or restarted and the motorcar had no reboots, the aforementioned desktop session would exist presented at the next logon.
Shut the VNC Viewer windows for joevnc and janevnc. Close their concluding sessions, likewise. From the principal terminal window, check to see if the VNC services are still running:
sudo systemctl status vncserver@:4.service The output shows that the remote desktop is still running:
vncserver@:4.service - Remote desktop service (VNC) Loaded: loaded (/etc/systemd/system/vncserver@:4.service; enabled) Active: agile (running) since Sat 2014-xi-01 12:06:49 EST; 58min ago Procedure: 2014 ExecStart=/sbin/runuser -l joevnc -c /usr/bin/vncserver %i -geometry 1280x1024 (lawmaking=exited, status=0/SUCCESS) . . . Check the second service:
sudo systemctl condition vncserver@:v.service This ane is running, likewise:
vncserver@:5.service - Remote desktop service (VNC) Loaded: loaded (/etc/systemd/system/vncserver@:5.service; enabled) Active: active (running) since Sat 2014-11-01 12:42:56 EST; 22min ago Process: 3748 ExecStart=/sbin/runuser -l janevnc -c /usr/bin/vncserver %i -geometry 1280x1024 (code=exited, status=0/SUCCESS) . . . If you wanted to log back into joevnc's desktop at this bespeak, yous'd run across the same figurer app open.
This presents some interesting challenges for arrangement administrators. If y'all have a number of users connecting to the server via VNC, you may want to devise some way to cease their VNC services when no longer needed. This may save some valuable system resources.
Troubleshooting — VNC Service Crashes
As you examination and play effectually with VNC, you may sometimes find the service has crashed and is unrecoverable. When y'all attempt to check the condition:
sudo systemctl status vncserver@:4.service This long error message may come up:
vncserver@:4.service - Remote desktop service (VNC) Loaded: loaded (/etc/systemd/system/vncserver@:4.service; enabled) Active: failed (Result: go out-code) since Fri 2014-11-07 00:02:38 EST; 2min 20s ago Process: 2221 ExecStart=/sbin/runuser -l joevnc -c /usr/bin/vncserver %i -geometry 1280x1024 (code=exited, status=2) Process: 1257 ExecStartPre=/bin/sh -c /usr/bin/vncserver -kill %i > /dev/aught 2>&ane || : (lawmaking=exited, status=0/SUCCESS) Trying to start the service doesn't piece of work:
sudo systemctl commencement vncserver@:four.service Failed startup:
Job for vncserver@:four.service failed. See 'systemctl status vncserver@:four.service' and 'journalctl -xn' for details. Usually the reason is simple enough. Check /var/log/messages:
sudo tail /var/log/messages The related mistake will expect similar this:
Nov 7 00:08:36 localhost runuser: Warning: localhost.localdomain:4 is taken because of /tmp/.X11-unix/X4 Nov vii 00:08:36 localhost runuser: Remove this file if there is no 10 server localhost.localdomain:four Nov 7 00:08:36 localhost runuser: A VNC server is already running as :4 Nov 7 00:08:36 localhost systemd: vncserver@:4.service: control process exited, code=exited condition=2 November 7 00:08:36 localhost systemd: Failed to start Remote desktop service (VNC). Nov 7 00:08:36 localhost systemd: Unit vncserver@:iv.service entered failed land. Nov 7 00:08:36 localhost systemd: Failed to mark scope session-c3.scope as abandoned : Stale file handle The remedy is to delete the file under /tmp folder:
sudo rm -i /tmp/.X11-unix/X4 Output:
rm: remove socket '/tmp/.X11-unix/X4'? y Then first the VNC service:
sudo systemctl start vncserver@:4.service General Troubleshooting
Although relatively rare, you may encounter other errors when working with VNC. For example, your remote desktop screen can go bare or hang, the session might crash with a cryptic error bulletin, VNC Viewer may not connect properly or transmit commands to the GUI to launch applications, etc.
We recommend checking the /var/log/letters file to get a improve understanding. At times you may demand to reboot your server, or in extreme cases recreate the VNC service.
System resources can also be a culprit; you may have to add extra RAM to your Droplet, etc.
Step 8 — Securing VNC Sessions through SSH Tunneling
So far both joevnc and janevnc have been accessing their remote desktops through unencrypted channels. As we saw before, VNC Viewer warns u.s.a. about this at connexion time; but the countersign is encrypted equally the sessions begins. Any subsequent network traffic and information transfer is open up for anyone to intercept in the middle.
About SSH Tunnelling
This is where Secure Vanquish (SSH) sessions tin can help. With SSH, VNC tin run within the context of an SSH encrypted session. This is known equally tunnelling. In upshot, VNC traffic piggybacks on the SSH protocol, resulting in all of its communication with the server being encrypted. It'due south called tunnelling because SSH is providing wraparound protection over VNC and VNC is running as if in a tunnel within SSH. SSH tunnelling can exist used for other protocols similar Popular, X, or IMAP besides.
SSH tunnelling works with port forwarding which is basically a ways of translating access from one particular port to a different port on some other machine. With port forwarding, when a customer awarding connects to Port A running on machine A, it'southward transparently forwarded to port B running on auto B. The client application is unaware of this translation and thinks information technology's connecting to the original port. Port forwarding is ane of the features of SSH protocol.
For more detailed information about SSH tunneling, read this tutorial.
In this tutorial we have configured VNC to run on ports 5904 (for joevnc) and 5905 (for janevnc).
With port forwarding, we can set our local VNC client to connect to port 5900 on the local customer estimator, and this tin be mapped to port 5905 on the remote server. This is example is for janevnc'southward connexion, but y'all could hands follow the same steps for any other clients.
When the VNC client application starts, information technology can exist pointed to port 5900 on localhost, and our port forwarding will transparently transport it to port 5905 on the remote server.
Notation: You'll have to outset an SSH section each time to make the connection secure.
Os X
On your Mac, open up Concluding.
Enter the following connectedness information, existence sure to replace your_server_ip with your remote server's IP accost:
ssh -Fifty 5900:your_server_ip:5905 janevnc@your_server_ip -North Enter janevnc'southward UNIX password. The connectedness volition appear to hang; you can continue it running for as long as yous use the remote desktop.
Now skip alee to the VNC Viewer instructions.
Windows
For securing janevnc's VNC session, we volition assume the local Windows figurer has PuTTY installed. PuTTY is gratuitous and can be downloaded from hither.
If janevnc's VNC and final sessions are not closed already, close them now.
First PuTTY. In the session screen, ensure you specify the server IP address and give a descriptive name to the connection, and then click the Salve button to save the connection details. Note how we take specified username@your_server_ip in the Hostname field:

Next, expand the SSH menu detail in the left navigation pane, and select the X11 item. This shows the X11 forwarding backdrop for the session. Ensure the checkbox for Enable X11 forwarding is checked. This ensures that SSH encrypts X Windows traffic that flows between the server and client:

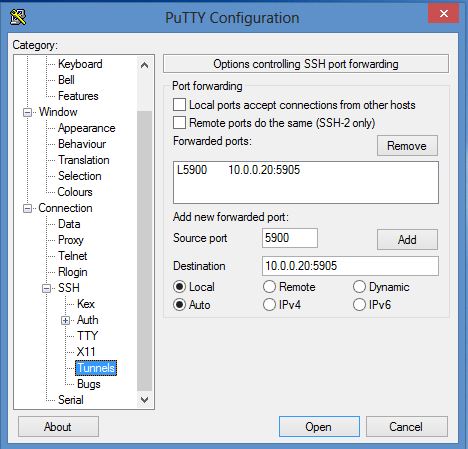
Finally, select SSH > Tunnels. Blazon 5900 in the Source port field. In the Destination field, specify your server'south name or IP address, followed by a colon and the VNC port number for the intended user. In our example, we take specified your_server_ip:5905.
Alternately, y'all could use port 5902. The two in this instance would be the display number for janevnc (remember the message displayed when janevnc ran the vncserver command).
Click the Add button and the mapping will be added under Forwarded ports. This is where we are calculation port forwarding for the SSH session; when the user connects to localhost at port 5900, the connection volition be automatically tunnelled through SSH to the remote server'south port 5905.
Get dorsum to the Sessions items and relieve the session for janevnc. Click the Open button and a new last session will open for janevnc. Log in equally janevnc with the appropriate UNIX password:

VNC Viewer
Adjacent start VNC Viewer again. This time, in the VNC Server address, blazon <^> and let VNC server choose the encryption method:

Click the Connect button.
Yous will nonetheless get the dialogue box warning you lot nearly an unencrypted session, just this time you can safely ignore it. VNC Viewer doesn't know almost the port it'southward being forwarded to (this was set in the SSH session only started) and assumes you lot are trying to connect to the local machine.
Accepting this warning will show the familiar password prompt. Enter janevnc'south VNC password to access the remote desktop.
And then how practise y'all know the session was encrypted? If you think about it, we had set port forwarding in the SSH session. If an SSH session wasn't established, port forwarding wouldn't have worked. In fact, if you shut the terminal window and log out of the PuTTY session so endeavor to connect with VNC Viewer alone, a connection attempt to localhost:5900 would prove the following error bulletin:

Then, if the localhost:5900 connection works, yous can exist confident that the connectedness is encrypted.
Remember that yous will want to found the SSH connection starting time every time you use VNC, to brand certain your connectedness is e'er encrypted.
Conclusion
Accessing your CentOS Linux system from a GUI front stop can brand system administration much simpler. You can connect from whatsoever client operating system and don't have to depend on web-based hosting control panels. VNC has a much smaller footprint compared to most control panels.
Although we have shown how two ordinary users can connect with their VNC clients, that'south hardly practical in serious production environments. In reality, users volition have customized applications or browsers for accessing the server. Running a number of VNC services for each user too creates an unnecessary brunt on arrangement resources, not to mention the inherent risks associated with it.
If you lot decide to install and run VNC on your production Linux server, we strongly recommend using it for authoritative purposes only.
Source: https://www.digitalocean.com/community/tutorials/how-to-install-and-configure-vnc-remote-access-for-the-gnome-desktop-on-centos-7
Posted by: santosbegges47.blogspot.com
0 Response to "How To Configure Vnc Server In Windows 7"
Post a Comment